
If the waste ink container becomes full, an error message with the error code [5B00] will be displayed. This error will cause the indicator light to flash alternately seven times, and it will turn yellow and orange. This problem indicates that the printer cannot be used and should be fixed immediately. Get to more about canon ip110 troubleshooting.
It takes two steps to correct the full error in the waste ink absorber. The first step is to replace your ink absorber. After the ink absorber has been replaced, the next step is resetting the waste ink counter back to zero. The printer can then be used again once the first two stages have been completed. This is the Canon Pixma iP110 error ink absorber complete 5B00.
Problem Description
Operator Call Error
8-times Blinking Alarm LED
Error: Warning! The ink absorber is almost full. [1700]
Notice: If the ink count reaches 95%, the printer will warn you that the ink absorber is almost full. [1700]”. This warning is known as “Operator Call Error”. To continue printing, you can press the STOP button 1x when this warning appears.
Table of Contents
Service Call Errors
7-times the number of cycles of blinking alarm and power LEDs
Error: Ink absorber full
Error code
Notice: The printer will display an error message “Ink absorber full [5B00]” when the waste ink absorber has reached 100%. This error message is known as a “Service Call Error”. This error causes the alarm and power lights to flash alternately 7 times and the printer can’t be used.
Solution:
1. Clean or replace the ink absorber.
2. Set the ink absorber counter back to zero.
Solution
1. Clean or replace the ink absorber kits
The bottom of the Canon Pixma iP110 printer houses the ink absorber. Before disassembling the printer, make sure that you have a brand new ink absorber. You can clean the ink absorber if a replacement kit is not on the market. How to clean an ink absorber.
– Take out the ink absorber and soak it in water.
– Replace the water if it is cloudy.
– Continue soaking until your ink absorber kit becomes clean.
After the ink absorber has been soaked, let it dry in the sun or air dry.
Before replacing the ink absorber, make sure it is completely dry.
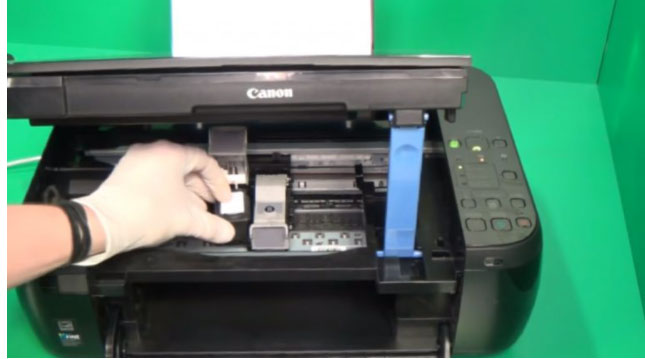
We must disassemble the printer to replace or clean the ink absorption kit. It is located at the bottom. The image below shows how to disassemble the Canon Pixma iP110 printer.
The next step after the ink absorber has been replaced is to assemble it again. To prevent any further damage, ensure that the printer assembly has been done correctly and carefully. The next step after the ink absorber has been cleaned or replaced, is to reset it to zero.
2. Set the ink absorber counter at zero
STEP 1. – Switch to Service Mode
The Canon printer must be set to Service Mode in order to reset it. This is how to put the Canon iP110 in Service Mode.
Operation procedures for service mode
1 Turn off your printer
2 Hold the STOP button down and press it again
3 Hold the ON button down and press it.
4 Press the STOP button, but do not press the ON button.
5 Hold the ON button and press the STOP button 5x. Then, release the ON key.
STEP 2: Reset the ink absorber counter back to zero
According to the Canon Pixma iP110 service manual, Service Tool v.4420 is required to reset the waste counter. Use Service Tool v.4420 or higher to reset Canon Pixma iP110.
-
- Before you run this tool, ensure that the printer is in the Service Mode.
- Download Service Tool v.4906
- Open Service Tool v.4906. You can use mac OS X to access the Open Service Tool v.4906. Please read the following How do you open Canon Service Tool on macOS X.
- Load paper A4 and Letter.
- For reference, please click EEEPROM (1) before you reset. Wait for the printer’s print to complete. Pay attention to the EEPROM information printed out below.
D = Main ink absorber
Dp = Platen ink absorber (AW: platen ink absorber away, HM: platen ink absorber home)
DL = Ink absorber Life (DL=00014 signifies that the main ink absorber has a 14-month remaining life.
Note:
-
-
- If D=100.00 is reached, the Main Ink Absorber Kit must be replaced/cleaned. After that, the Main Ink Absorber Counter must be reset.
- If Dp AW is 100.0, then the Platen absorber must first be cleaned. After that, the Platen absorber counter must again be reset.
- If Dp HM 100.0, then the Platen absorber must first be cleaned. After that, the Platen absorber counter must again be reset.
- If DL=000, then the Main ink absorber should be replaced as the life expectancy has expired.
-
-
-
- Clear Ink Counter. Select ALL (2), then click RESET (3). This will reset the Main and Platen counters to zero. The counter value will be printed automatically after the ink absorber counter has been reset. Wait for the printer’s final print.
- After resetting, click EEPROM (1) again. Wait for the printer’s final print. Compare EEPROM information before reset and after reset. Look at D, Dp AW and Dp HM. Compare the D, Dp.AW and Dp.HM values before and after reset.
- If everything goes well, close the Service Tool and turn off your printer.
- After waiting for 10 seconds, turn ON the printer. The printer is now ready to be use.
- Done.
-
Two steps are require to repair the ink absorber printer full error message.
-
- The second step is to reset the waste ink counter back to zero.
- First, clean or replace the ink absorber.
-
- If you are having trouble with this, please contact the Canon Service Center nearest to you or a printer repair professional.